Outdoor Terrace in Coronado
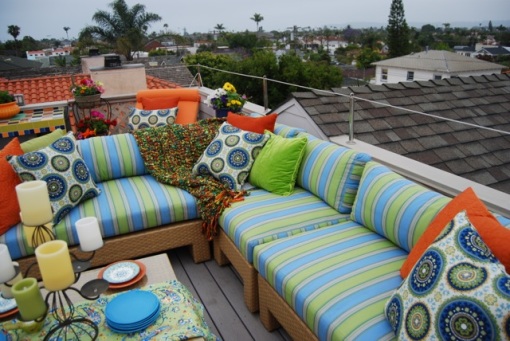
Ready for summer entertaining.
Ready for summer entertaining.
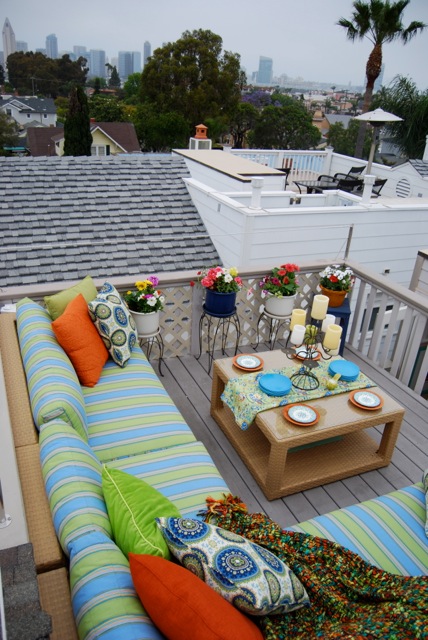
A beautiful place to sit and entertain a few friends.

Added a splash of color to this outdoor terrace using blue, orange and green
This summer I have been working on a lot of outdoor projects. With such beautiful weather in San Diego why wouldn’t we want to extend our living areas to the outdoors?
When planning your outside space, some same interior design principles apply:
Texture (think layers of stone, wood, tile, iron, fabric, water, and a limitless supply of plants – no lack of texture here)
Color (everything contributes color, from the plants, to the concrete, to even your seat cushions – choose wisely and have a plan to execute. I don’t think I can look at any more pink concrete)
Scale (watch the size of your patio furniture and even trees)
Space Planning (which I think should always come first – who wants to carry food over obstacles to that brand new pavilion – no matter how beautiful it is)
Lighting (so many options to choose from – put some light out there and extend your outdoor hours)
You get the idea. Let’s live outside! Get inspired and start creating your own perfect space surrounded by nature.
 Here is a picture of new carpet on stairs from a project that I completed recently. I find this carpet not only fun and stylish but practical. Here’s why…
*The two toned colors and pattern hide dirt easier than your basic beige carpet
*It’s loop pile gives it a low profile that provides a high performance for high traffic areas
I love the bold pattern and color for this location. It gives the stairs their own punch of design.
 At the top of the stairs I convinced the home owners to add hard wood flooring on the landing. The space is so large that it feels like a room of it’s own. Mixing up the flooring adds texture, and adds a visual break to the massive hallway and stairway. We carried this idea into the vestibule area by the kids bedroom. Adding the wood flooring not only gave the transition area it’s own definition, but it allowed us a break in flooring to add a different super plush carpet for the kids bedrooms.
Mixing up Flooring? You mean the whole house doesn’t have to have the same carpet??? Answer – NOPE
While I’m not suggesting that you join two different carpets next to each other, I am suggesting a good use of variety. With all the different patterns and colors in carpet. Try to think of some carpets like area rugs. Break up large areas with wood floor, or stone tile transition areas. Create texture, and keep all the flooring in similar color tones.
So what do you do when custom designer drapes are not in the budget? After you’ve shopped around you will find that store bought panels fall short in many categories: they don’t fit, they are not the right color, or they lack in style.
With a little sewing skills and a new perspective, you will soon find that store bought panels are just the beginning to your creativity.

store bought panels
For this project I will be adding 16″ of the red stripe panel to the existing 84″ brown panel to create not only a custom look, but also to cover a sliding glass door with a ceiling height of 9′.
Good advice for any project you take on… Pay special attention to the preparation and set up! Modifying drapery panels you will spend the most time measuring, pinning, ironing, and measuring again. Sewing is quick, taking out stitches is agonizing – take your time measuring & verifying!

 pin your fabric so it doesn’t slip when you sew.
 If you lightly draw a line on your fabric before you sew as a guidline, you will make a perfect line. (which is really important for lining up the two panels side by side later)
 here no sew tape is used to hide the seams on the back side.
 This is how the finished project turned out…. I can’t wait to bring them to my client’s house and show her the finished product.
 When you take the time to measure the two panels line up perfectly.

Come check out our vendor booth at Urban Barn Friday November 12th & Saturday the 13th
155 W. CREST
ESCONDIDO, CA 92025
Lots of one of a kind vintage finds, ideas & gifts for Christmas, succulent center pieces in vintage dish ware, and designer pillows. See you there.


I found this great 1960’s headboard and new immediately I wanted to transform it into a shabby chic style headboard for a little girl’s room.
First I had to add a few details so it would work with the height of a 2010 bed. The frame was about 12″ too short. I simply added 2 blocks of wood attached with brackets at the base of each leg. Then I added a horizontal board at the place where the mattress would reach the headboard.
Once the frame was the right size, I then sanded all over with an electric sander and wiped away any dust. Next, I spray painted a coat of primer (white). Once it was dry, I then painted 2 coats of interior flat paint (waiting for dry time in between each coat).
Finishing coat: Minwax polycrylic clear semi-gloss finish (2 coats)
The finished product was just the look this room needed. It is a focal point of the room. An awesome detail – the headboard was a budget friendly $20.
Someone asked me yesterday if you had to match your curtains to your furniture. When it comes to designing interiors I really don’t like the word “match”. Try to use patterns, textures, and colors that compliment each other. The more variety in a space the more interesting it appears.

Here the middle stripe and curved wall (once blue) have been painted lavender to coordinate with the new bedding. My client liked the look of the existing room, but didn’t know how to incorporate the color scheme with her new lavender & yellow baby bedding. My advice: I suggested not painting the room lavender & yellow because it matched the crib sheets.
Committing to such a strong color palette will limit your choices. What will you do with all the pink goodies that you will receive when everyone finds out you are having a girl? What do you do when your toddler no longer likes lavender? Adding more color in the room not only gives you more design freedom, it also adds visual depth.
Solution: we kept the yellow, green, and brown accent stripe and painted over all the blue with a muted lavender tone. Next step is to add more pink and green accent colors in the drapery panels and pillows. So when the room is finished it will have a layered color scheme, each color building on the next. Instead of an out of the box lavender & yellow room.
